Difference between revisions of "CI/Windows"
| (8 intermediate revisions by the same user not shown) | |||
| Line 2: | Line 2: | ||
== Setting up the PC as a server == | == Setting up the PC as a server == | ||
| + | To set up the PC as a server there are several setting that needs to be done. | ||
| + | First of all some applications needs to be installed. A batchfile needs to be made and some batchfiles needs to be scheduled with task scheduler. | ||
| − | |||
| − | |||
And the last step is setting up the PC to not go in standby mode. | And the last step is setting up the PC to not go in standby mode. | ||
| − | |||
== Installing the applications == | == Installing the applications == | ||
| − | |||
The next apllications need to be installed to set the PC as a server. | The next apllications need to be installed to set the PC as a server. | ||
| − | |||
* Jenkins: In order to install jenkins go to the [http://openmbd.com/wiki/CI/Jenkins Jenkins] page. | * Jenkins: In order to install jenkins go to the [http://openmbd.com/wiki/CI/Jenkins Jenkins] page. | ||
| Line 18: | Line 15: | ||
* SonarQube: In order to install SonarQube go to the [http://openmbd.com/wiki/CI/SonarQube SonarQube] page. | * SonarQube: In order to install SonarQube go to the [http://openmbd.com/wiki/CI/SonarQube SonarQube] page. | ||
| − | * TestExecute: In order to install | + | * TestExecute: In order to install TestExecute go to the [http://openmbd.com/wiki/CI/TestExecute TestExecute] page. |
| − | |||
| − | |||
| − | |||
| − | |||
| − | * | + | * TestComplete: In order to install TestComplete go to the [http://openmbd.com/wiki/CI/TestComplete TestComplete] page. |
| − | * | + | * TortoiseSVN: In order to install TortoiseSVN go to the [http://openmbd.com/wiki/CI/TortoiseSVN TortoiseSVN] page. |
| + | * Apache Ant: In order to install Apache Ant go to the [http://openmbd.com/wiki/CI/Ant Ant] page. | ||
| + | * JUnit: In order to install JUnit go to the [http://openmbd.com/wiki/CI/JUnit JUnit] page. | ||
== Startup scripts == | == Startup scripts == | ||
| + | ===Batchfiles=== | ||
There are two scripts that need to be run. | There are two scripts that need to be run. | ||
| − | |||
* One for Jenkins: JenkinsStartUp.bat | * One for Jenkins: JenkinsStartUp.bat | ||
| − | |||
* One for SonarQube: StartSonar.bat | * One for SonarQube: StartSonar.bat | ||
| − | |||
The batchfile for Jenkins needs to be made. | The batchfile for Jenkins needs to be made. | ||
| − | |||
An example of this batchfile is shown below. | An example of this batchfile is shown below. | ||
cd "C:\Program Files (x86)\Jenkins" | cd "C:\Program Files (x86)\Jenkins" | ||
runas /user:TestServer-PC\TestServer /htsauto jenkins.exe | runas /user:TestServer-PC\TestServer /htsauto jenkins.exe | ||
| − | |||
| − | |||
The batchfile for SonarQube can be find in the map of SonarQube. | The batchfile for SonarQube can be find in the map of SonarQube. | ||
| Line 54: | Line 44: | ||
The StartSonar.bat must look like this batchfile if editing it. | The StartSonar.bat must look like this batchfile if editing it. | ||
| − | |||
| − | |||
| − | + | [[File:SonarBat.png|400px]] | |
| − | |||
| − | |||
| − | |||
| − | |||
| − | |||
| − | |||
| − | |||
| − | |||
| − | |||
| − | |||
| − | |||
| − | |||
| − | |||
| − | |||
| − | |||
| − | |||
| − | |||
| − | |||
| − | |||
| − | |||
| − | |||
| − | |||
| − | |||
| − | |||
| − | |||
| − | |||
| − | |||
| − | |||
| − | |||
| − | |||
| − | |||
| − | |||
| − | |||
| − | |||
| − | |||
| − | |||
| − | |||
| − | |||
| − | |||
| − | |||
| − | |||
| − | |||
| − | |||
| − | |||
| − | |||
| − | |||
| − | |||
| − | |||
| − | |||
| + | ===Schedule tasks with Windows Task Scheduler=== | ||
To let the server of Jenkins and SonarQube run, Task Scheduler is used, to let the batchfiles run. | To let the server of Jenkins and SonarQube run, Task Scheduler is used, to let the batchfiles run. | ||
| − | + | The following steps must be followed. Open Task Scheduler and click on "Action" and then click on "Create Task". | |
| − | The following steps must be followed. Open Task Scheduler and click on "Action" and then click on "Create Task". An example of this is shown on the picture below. | + | |
| + | An example of this is shown on the picture below. | ||
[[File:TaskSchedulerHome.png|400px]] | [[File:TaskSchedulerHome.png|400px]] | ||
| Line 123: | Line 64: | ||
[[File:TaskSchedulerTriggers.png|400px]] | [[File:TaskSchedulerTriggers.png|400px]] | ||
| − | After that click on "Begin the task" and choose "At log on" for the nightly build. It is also possible to choose a day, time, week et cetera. Click on the box "Enabled". An example of this is shown on the picture below. | + | After that click on "Begin the task" and choose "At log on" for the nightly build. It is also possible to choose a day, time, week et cetera. Click on the box "Enabled". |
| + | |||
| + | An example of this is shown on the picture below. | ||
[[File:TaskSchedulerTriggersTask.png|400px]] | [[File:TaskSchedulerTriggersTask.png|400px]] | ||
| Line 140: | Line 83: | ||
* Start the task only if the computer is on AC power. | * Start the task only if the computer is on AC power. | ||
* Stop if the computer switches to battery power. | * Stop if the computer switches to battery power. | ||
| + | |||
An example of this schreen can be seen on the picture below. | An example of this schreen can be seen on the picture below. | ||
| Line 147: | Line 91: | ||
* Allow task to be run on demand. | * Allow task to be run on demand. | ||
* If the running task does not end when requested, force stop. | * If the running task does not end when requested, force stop. | ||
| + | |||
See the picture below for an example of the screen. | See the picture below for an example of the screen. | ||
[[File:TaskSchedulerSettings.png|400px]] | [[File:TaskSchedulerSettings.png|400px]] | ||
| − | |||
Now click on "Ok" and close Task Scheduler. | Now click on "Ok" and close Task Scheduler. | ||
| Line 160: | Line 104: | ||
* Environment variables | * Environment variables | ||
* standby setting | * standby setting | ||
| − | |||
===Environment variables=== | ===Environment variables=== | ||
For the environment variables click on "Windows start", and type "env" and click on "Edit environment variables for your account". | For the environment variables click on "Windows start", and type "env" and click on "Edit environment variables for your account". | ||
| + | |||
The window that will be shown on the screen is shown below. | The window that will be shown on the screen is shown below. | ||
| Line 170: | Line 114: | ||
In order to add a new environment variables click on "New". In the "variable name" cassette type in Jenkins. In the "variable value" cassette type in the path where Jenkins is installed. | In order to add a new environment variables click on "New". In the "variable name" cassette type in Jenkins. In the "variable value" cassette type in the path where Jenkins is installed. | ||
| + | |||
In the picture below is shown an example of the jenkins environment variable. | In the picture below is shown an example of the jenkins environment variable. | ||
| Line 175: | Line 120: | ||
For the communication between TestComplete and TestExecute, there must be te same environment variable for the map of SVN. | For the communication between TestComplete and TestExecute, there must be te same environment variable for the map of SVN. | ||
| + | |||
An example of this is shown in the picture below. | An example of this is shown in the picture below. | ||
| Line 185: | Line 131: | ||
In order to turn of automatic locking the PC click on "Windows start", and type "scr" and click on "Turn screen saver on or off". | In order to turn of automatic locking the PC click on "Windows start", and type "scr" and click on "Turn screen saver on or off". | ||
| + | |||
There will appear a window like the picture below. | There will appear a window like the picture below. | ||
| Line 192: | Line 139: | ||
Now again click on "Windows start", and type "po" and click on "Power Options". | Now again click on "Windows start", and type "po" and click on "Power Options". | ||
| + | |||
The next window will be seen on the screen. | The next window will be seen on the screen. | ||
Latest revision as of 13:00, 1 November 2017
Contents
Setting up the PC as a server
To set up the PC as a server there are several setting that needs to be done. First of all some applications needs to be installed. A batchfile needs to be made and some batchfiles needs to be scheduled with task scheduler.
And the last step is setting up the PC to not go in standby mode.
Installing the applications
The next apllications need to be installed to set the PC as a server.
- Jenkins: In order to install jenkins go to the Jenkins page.
- SonarQube: In order to install SonarQube go to the SonarQube page.
- TestExecute: In order to install TestExecute go to the TestExecute page.
- TestComplete: In order to install TestComplete go to the TestComplete page.
- TortoiseSVN: In order to install TortoiseSVN go to the TortoiseSVN page.
- Apache Ant: In order to install Apache Ant go to the Ant page.
- JUnit: In order to install JUnit go to the JUnit page.
Startup scripts
Batchfiles
There are two scripts that need to be run.
- One for Jenkins: JenkinsStartUp.bat
- One for SonarQube: StartSonar.bat
The batchfile for Jenkins needs to be made. An example of this batchfile is shown below.
cd "C:\Program Files (x86)\Jenkins"
runas /user:TestServer-PC\TestServer /htsauto jenkins.exe
The batchfile for SonarQube can be find in the map of SonarQube. The path can look like this:
C:\Program Files\SonarQube\sonarqube-5.6.6\bin\windows-x86-64
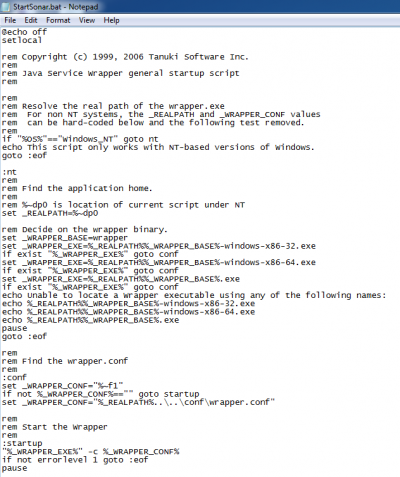
The StartSonar.bat must look like this batchfile if editing it.
Schedule tasks with Windows Task Scheduler
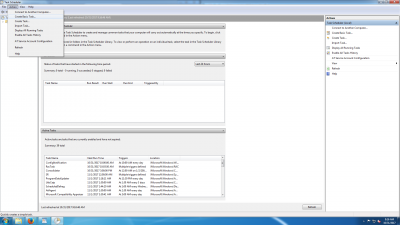
To let the server of Jenkins and SonarQube run, Task Scheduler is used, to let the batchfiles run. The following steps must be followed. Open Task Scheduler and click on "Action" and then click on "Create Task".
An example of this is shown on the picture below.
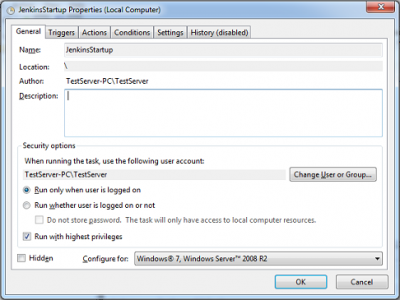
When clicked on "Create Task" there will be a screen like the picture below. Fill in the name and choose in the "Security optios" "Run only when user is logged on" and choose "Run with highest privileges". Also choose the correct "Conigure for" system.
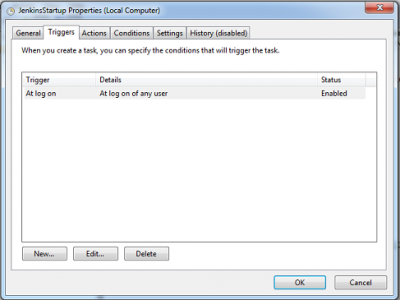
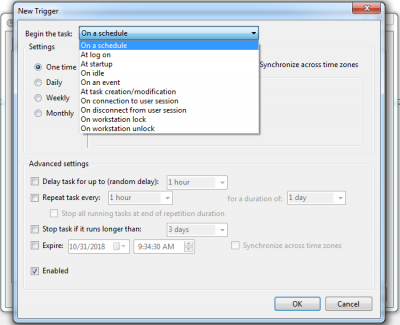
Then click on the "Triggers" tab, there will be a screen like the picture below, and click on "New".
After that click on "Begin the task" and choose "At log on" for the nightly build. It is also possible to choose a day, time, week et cetera. Click on the box "Enabled".
An example of this is shown on the picture below.
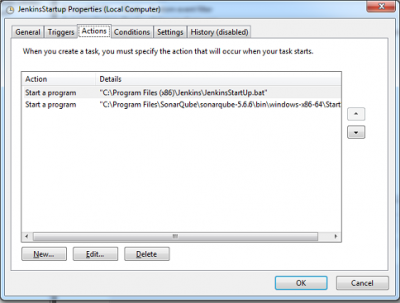
Now click on the tab "Actions" and there will appear a screen similair as the picture below.
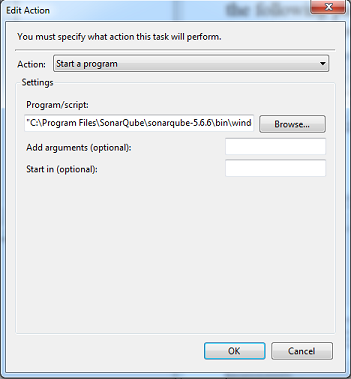
To add a new program, click on "New" and there a screen like the picture below will appear. Click on "Browse" and for example to start SonarQube, the following path can be used: "C:\Program Files\SonarQube\sonarqube-5.6.6\bin\windows-x86-64\StartSonar.bat"
To see how to add a batchfile see...
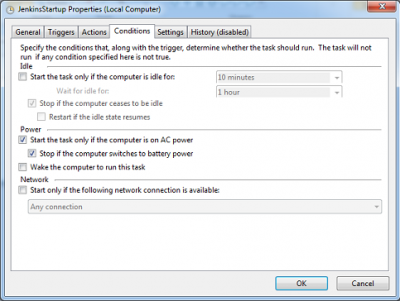
Next step click on "Conditions" and make sure that the following boxes are clicked:
- Start the task only if the computer is on AC power.
- Stop if the computer switches to battery power.
An example of this schreen can be seen on the picture below.
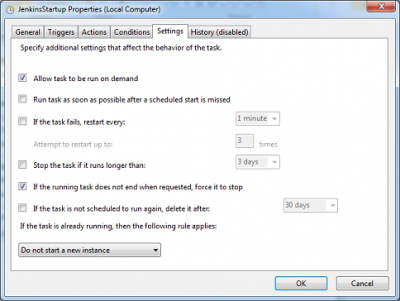
The last step is clicking on the tab "Settings". The following boxes mus be clicked:
- Allow task to be run on demand.
- If the running task does not end when requested, force stop.
See the picture below for an example of the screen.
Now click on "Ok" and close Task Scheduler.
Windows Settings
The next Windows Settings must be set:
- Environment variables
- standby setting
Environment variables
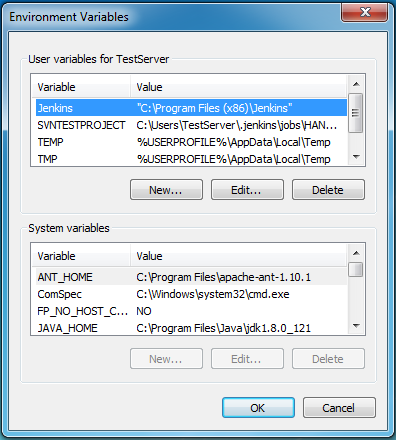
For the environment variables click on "Windows start", and type "env" and click on "Edit environment variables for your account".
The window that will be shown on the screen is shown below.
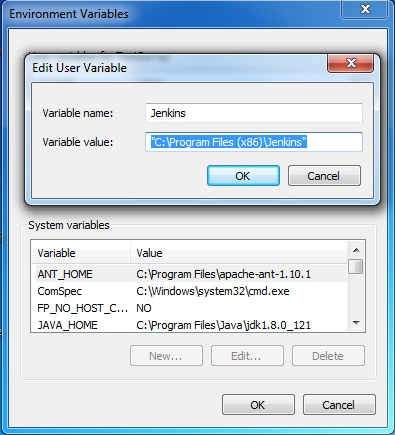
In order to add a new environment variables click on "New". In the "variable name" cassette type in Jenkins. In the "variable value" cassette type in the path where Jenkins is installed.
In the picture below is shown an example of the jenkins environment variable.
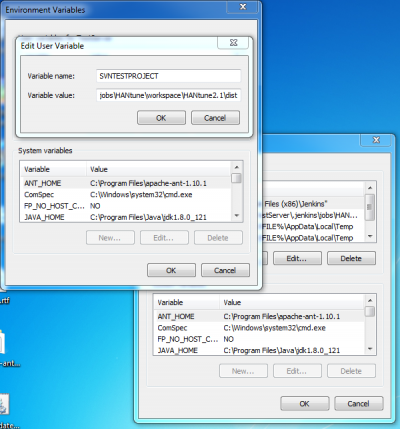
For the communication between TestComplete and TestExecute, there must be te same environment variable for the map of SVN.
An example of this is shown in the picture below.
Standby setting
The server PC must be always on in order to build tests. The next settings must be done:
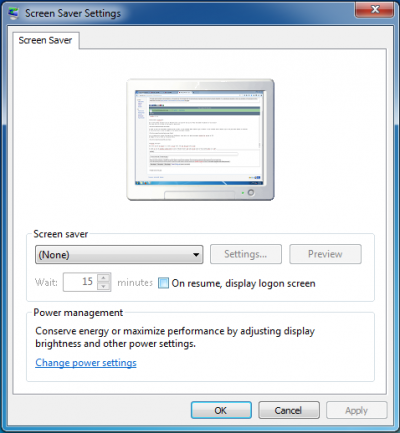
In order to turn of automatic locking the PC click on "Windows start", and type "scr" and click on "Turn screen saver on or off".
There will appear a window like the picture below.
Now click on the arrow and choose "None", then unclick "On resume, display logon screen" and click on "Apply" and then on "Ok".
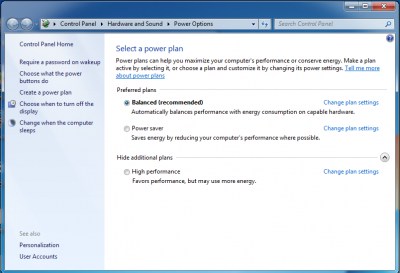
Now again click on "Windows start", and type "po" and click on "Power Options".
The next window will be seen on the screen.
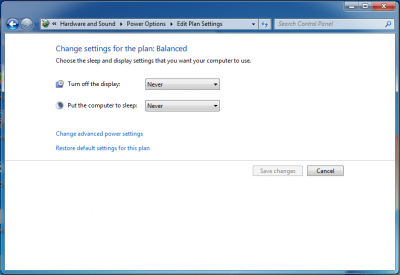
Click on "Balanced (recommended)" and then click on "Change plan settings".
Click next to the cassette "Tun off the display" and click on "Never". Also click next to the cassette "Put the computer to sleep" and click on "Never". Then click on "Save changes", and the settings are done.
