Difference between revisions of "E-trailer"
(→Plant model) |
(→Plant model) |
||
| Line 59: | Line 59: | ||
<br/> | <br/> | ||
| − | + | ==== Subsystems ==== | |
Notice that there are 2 extra subsystems located at the right-hand side of the e - trailer plant model figure. <br/> | Notice that there are 2 extra subsystems located at the right-hand side of the e - trailer plant model figure. <br/> | ||
The first subsystem (Battery current) is created as follows: | The first subsystem (Battery current) is created as follows: | ||
| Line 93: | Line 93: | ||
* Fourth, insert the from tag out of each goto tag. | * Fourth, insert the from tag out of each goto tag. | ||
* Fifth, connect each from tag to the empty port of sub_connector. | * Fifth, connect each from tag to the empty port of sub_connector. | ||
| − | |||
| − | |||
| − | |||
| − | |||
| − | |||
| − | |||
| − | |||
| − | |||
| − | |||
| − | |||
| − | |||
| − | |||
| − | |||
| − | |||
| − | |||
| − | |||
| − | |||
| − | |||
| − | |||
| − | |||
| − | |||
| − | |||
| − | |||
| − | |||
| − | |||
| − | |||
| − | |||
| − | |||
| − | |||
| − | |||
| − | |||
| − | |||
| − | |||
| − | |||
| − | |||
| − | |||
| − | |||
| − | |||
| − | |||
| − | |||
| − | |||
| − | |||
| − | |||
| − | |||
| − | |||
| − | |||
| − | |||
| − | |||
| − | |||
| − | |||
| − | |||
| − | |||
| − | |||
| − | |||
| − | |||
| − | |||
| − | |||
| − | |||
| − | |||
| − | |||
| − | |||
| − | |||
| − | |||
| − | |||
| − | |||
| − | |||
| − | |||
| − | |||
| − | |||
| − | |||
| − | |||
| − | |||
| − | |||
| − | |||
| − | |||
| − | |||
| − | |||
| − | |||
| − | |||
| − | |||
| − | |||
| − | |||
| − | |||
| − | |||
| − | |||
| − | |||
| − | |||
| − | |||
| − | |||
| − | |||
| − | |||
| − | |||
| − | |||
| − | |||
| − | |||
| − | |||
| − | |||
| − | |||
| − | |||
| − | |||
| − | |||
| − | |||
| − | |||
| − | |||
| − | |||
| − | |||
| − | |||
| − | |||
| − | |||
| − | |||
| − | |||
| − | |||
| − | |||
| − | |||
| − | |||
| − | |||
| − | |||
| − | |||
| − | |||
| − | |||
| − | |||
| − | |||
| − | |||
| − | |||
| − | |||
| − | |||
| − | |||
| − | |||
| − | |||
| − | |||
| − | |||
| − | |||
| − | |||
| − | |||
| − | |||
| − | |||
| − | |||
| − | |||
| − | |||
| − | |||
| − | |||
| − | |||
| − | |||
| − | |||
| − | |||
| − | |||
| − | |||
| − | |||
| − | |||
| − | |||
| − | |||
| − | |||
| − | |||
| − | |||
| − | |||
| − | |||
| − | |||
| − | |||
| − | |||
=== Driver === | === Driver === | ||
Revision as of 07:33, 1 June 2018
This page provides the steps on how to model e-trailer project from e-Traction. The e-trailer project is a concept project from e-Traction in which e-trailer is a normal trailer that has an electric motor mounted to one of its axle.
The ultimate goal of this project is to increase energy efficiency [kWh/km], which leads to reducing operating cost.
Contents
Creating the model
The model is split into four different areas. Those are:
- Test scenario (Driving cycle)
- ECU
- Plant model (Parallel Hybrid vehicle powertrain component)
- Driver (Vehicle driver model)
Test scenario
- Insert the Test_scenario component to (ADVANCE) workspace, this component can be found under the Test Scenario in SIMarchitect Library.
ECU
A simple control algorithm has been developed and implemented into the e - trailer model in order to control the energy distribution between the Internal Combustion Engine and the Electric Machine. The control algorithm used the accelerator and brake pedal position to determine the demanded torque by the vehicle so that it can follow the desired driving cycle. The amount of throttle and brake required was calculated by the driver model. The required gear number for a certain moment was calculated by the gear shift logic that located inside the driver model. The electric machine is used together with the I.C.E. to achieve the demanded torque when the ECU determined that the demanded torque is above the maximum capability of what the engine can supply. If the state of charge of the battery is lower than the minimum charge value, the electric machine will be used as a generator to charge the battery during braking motion. The electric machine is also used to brake the vehicle when possible, however, mechanical brakes will be used when the braking torque from the electric machine is not sufficient.
To create the ECU subsystem:
- First insert an empty_area component to (ADVANCE) workspace, this component can be found under the modeling tools below TNO ADVANCE general library
- Second, rename this empty_area componenent into ECU.
- Third, delete the in and out ports inside the ECU subsystem as it is shown in the figure below.
- Fourth, insert the ECU module to the ECU subsytem and notice that there is an extra port next to the from tag, double click the sub_connector and change the number of inputs into 1 to delete this extra port. The ECU module and its parameter file can be downloaded (insert ECU module and its parameter)
(insert ECU subsystem screenshot)
Plant model
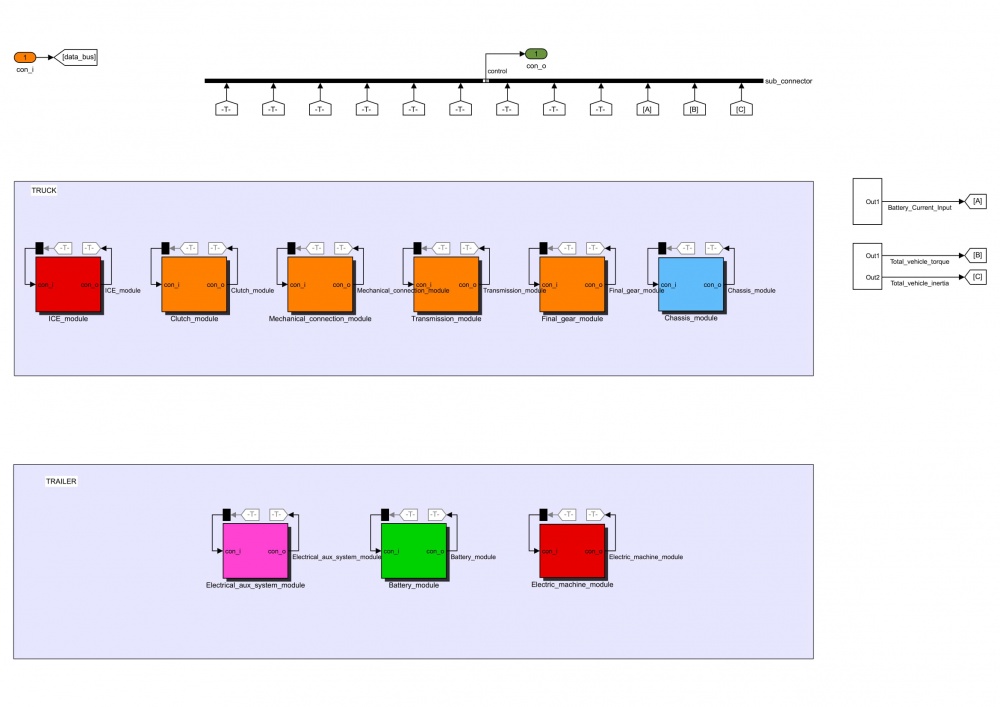
The plant model for e-trailer project is split up into two group, those are the truck and the trailer.
The components used for the truck group are:
- Internal Combustion Engine
- Clutch
- Mechanical connection
- Transmission
- Final gear
- Chassis
The components used for the truck group are:
- Battery
- Electric machine
- Electrical auxiliary system
To create the Plant_model subsystem:
- First insert an empty_area component to (ADVANCE) workspace, this component can be found under the modeling tools below TNO ADVANCE general library
- Second, rename this empty_area componenent into Plant_model.
- Third, delete the in and out ports inside the Plant_model subsystem as it is shown in the empty_area figure above.
- Fourth, insert the components described above to the Plant_model subsystem and order them as it is shown in the figure below. All of the components can be found in the downloaded SIMarchitect library
- Fifth, change the tag visibility setting (from local to global) of the goto tag from the Final_gear_module, Electrical_aux_system_module and Electric_machine_module. Tag visibility setting can be found by double-clicking the goto tag from each of the mentioned modules.
- Fifth, add three (3) extra ports in the sub_connector, this can be done by double-clicking the sub_connector and change the number of input to 12.
Subsystems
Notice that there are 2 extra subsystems located at the right-hand side of the e - trailer plant model figure.
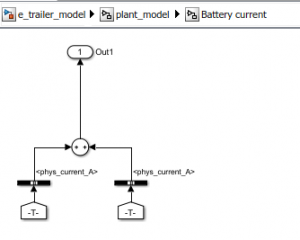
The first subsystem (Battery current) is created as follows:
- First, locate the from tag of Electric machine module and Electrical auxiliary system and copy-paste it in the workspace.
- Second, insert two (2) Bus Selector(s) and connect it to each tag.
- Third, double-click the first bus selector, remove signal1 and signal2 under the selected signals inside the bus selector prompt and select Electric_machine_electrical_fb__output.phys_current_A under the Electric_machine_sensor
- Fourth, double-click the second bus selector, remove signal1 and signal2 under the selected signals inside the bus selector prompt and select Electrical_aux_electrical_fb_output.phys_current_A under the Electrical_aux_sensor.
- Fifth, insert sum component from SIMULINK library browser to add the selected signals.
- Sixth, create a subsystem out of the components that just create the previous five steps. This can be done by block all of the created components then press ctrl+g to create a subsystem.
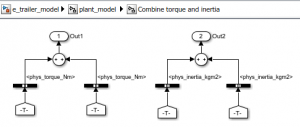
The second subsystem (Combine torque and inertia) is created as follows:
- First, locate the from tag of Electric_machine_module and Final_gear_module and copy-paste it in the workspace as two sets (2x Electric_machine_module and 2x Final_gear_module).
- Second, insert two (4) Bus Selector(s) and connect it to each tag.
- Third, double-click the first bus selector, remove signal1 and signal2 under the selected signals inside the bus selector prompt and select Electric_machine_mechanical_output.phys_torque_Nm under the Electric_machine_mechanical_output .
- Fourth, double-click the second bus selector, remove signal1 and signal2 under the selected signals inside the bus selector prompt and select Final_gear_mechanical_output.phys_torque_Nm under the Final_gear_mechanical_output.
- Fifth, insert sum component from SIMULINK library browser to add the selected signals from the previous two (2) steps.
- Sixth, double-click the third bus selector, remove signal1 and signal2 under the selected signals inside the bus selector prompt and select Electric_machine_mechanical_output.phys_inertia_kgm2 under the Electric_machine_mechanical_output.
- Seventh, double-click the fourth bus selector, remove signal1 and signal2 under the selected signals inside the bus selector prompt and select Final_gear_mechanical_output.phys_inertia_kgm2 under the Final_gear_mechanical_output.
- Eighth, insert sum component from SIMULINK library browser to add the selected signals from the previous (2) steps.
- Ninth, create a subsystem out of the components that just create the previous eight steps. This can be done by block all of the created components then press ctrl+g to create a subsystem.
Next, connect the output ports of the created subsystems to the sub_connector, to do this:
- First, insert three (3) goto tag to the workspace
- Second, rename them as you wish but for this case rename it into A, B and C accordingly.
- Third, rename the signal label into Battery_Current_input for tag A, Total_vehicle_torque for tag B and Total_vehicle_inertia for tag C.
- Fourth, insert the from tag out of each goto tag.
- Fifth, connect each from tag to the empty port of sub_connector.
Driver
The e-trailer project use manual transmission, therefore the driver manual module will be used as the driver model.
The input signals for the driver module are:
| Subsystem | Input signal | Signal label | Retrieved from |
|---|---|---|---|
| Plant model | Actual vehicle velocity | Chassis_vVehAct_mps | Chassis module sensor |
| Transmission input speed | Transm_nInAct_radps | Transmission module sensor | |
| Transmission actual gear number | Transm_nrGearAct | ||
| Clutch disengaged or not | Clu_flgConnected_B | Clutch module sensor | |
| Driver | Accelerator pedal rate | Drv_AccPedl_Rt | Driver manual module |
| Drive cycle | Drive cycle time and speed | drivecycle_time_speed | Test scenario area |
Simulation settings
The simulation settings for e-trailer project:
| Settings | Value |
|---|---|
| Time | 1800 [s] |
| Fixed - step size | 0.01 |
| Solver type | ode3 (Bogacki - shampine) |
The sequence of running the simulation:
- First, run parameter_main m.file
- Second, choose the desired output results in the Output Selector block
- Third, run the simulation
- Fourth, plot the results using Results Plot GUI block
Contact
For more information regarding the specification of the battery and electric motor please contact e-Traction
(insert contact person information)


