Difference between revisions of "HANcoder/Examples/Adding a customized block"
| Line 1: | Line 1: | ||
| − | This is a step-by-step guide for creating a custom block in MatLAB/Simulink and how to | + | This is a step-by-step guide for creating a custom block in MatLAB/Simulink and how to use custom functions written in the C programming language.<br> |
This guide assumes that [[downloads/HANcoder|HANcoder]] Beta V1.0 has been downloaded and installed successfully.<br> | This guide assumes that [[downloads/HANcoder|HANcoder]] Beta V1.0 has been downloaded and installed successfully.<br> | ||
<br> | <br> | ||
| − | The guide | + | The guide is written around an example project: the signal tower.<br> |
| − | The signal tower consists of four layers with two RGB LEDs per layer. Each | + | The signal tower consists of four layers with two RGB LEDs per layer. Each layer can be assigned 16777216 colors, 256 intensities for each RGB LED.<br> |
The signal tower is implemented by using WS2812B RGB LEDs. These LEDs are are connected in cascade and use a single serial transmission line.<br> | The signal tower is implemented by using WS2812B RGB LEDs. These LEDs are are connected in cascade and use a single serial transmission line.<br> | ||
| − | The timing required for generating the serial signal is implemented in C-code by using the microcontroller's SPI bus. As the STM32 on the Olimexino features two SPI busses (SPI1 and SPI2), | + | The timing required for generating the serial signal is implemented in C-code by using the microcontroller's SPI bus. As the STM32 on the Olimexino features two SPI busses (SPI1 and SPI2), the SPI interface can be selected as a block parameter.<br> |
<br> | <br> | ||
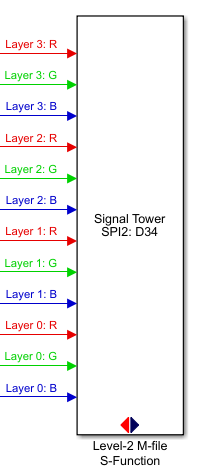
| − | The result in Simulink will be as | + | The result in Simulink will be as depicted below:<br> |
[[File:signal_tower_block_final_result.png]] | [[File:signal_tower_block_final_result.png]] | ||
<br> | <br> | ||
| − | The files that have been added or updated with respect to HANcoder Beta V1.0 can be downloaded [[File:here]]. | + | The files that have been added or updated with respect to HANcoder Beta V1.0 can be downloaded [[File:here]].<br> |
| + | The following parts provide a detailed description of these files and other changes that must be made.<br> | ||
<br> | <br> | ||
* Part 1: [[Matlab/Simulink files]] | * Part 1: [[Matlab/Simulink files]] | ||
Revision as of 12:19, 28 February 2019
This is a step-by-step guide for creating a custom block in MatLAB/Simulink and how to use custom functions written in the C programming language.
This guide assumes that HANcoder Beta V1.0 has been downloaded and installed successfully.
The guide is written around an example project: the signal tower.
The signal tower consists of four layers with two RGB LEDs per layer. Each layer can be assigned 16777216 colors, 256 intensities for each RGB LED.
The signal tower is implemented by using WS2812B RGB LEDs. These LEDs are are connected in cascade and use a single serial transmission line.
The timing required for generating the serial signal is implemented in C-code by using the microcontroller's SPI bus. As the STM32 on the Olimexino features two SPI busses (SPI1 and SPI2), the SPI interface can be selected as a block parameter.
The result in Simulink will be as depicted below:

The files that have been added or updated with respect to HANcoder Beta V1.0 can be downloaded File:Here.
The following parts provide a detailed description of these files and other changes that must be made.
- Part 1: Matlab/Simulink files
- Part 3: Creating a block in Simulink
- Part 2: C source files
- Part 4: Updating the build environment
- Part 5: Testing the project