Difference between revisions of "HANcoder/Training Material/ThrottleValveController/HardwareSetup"
| Line 7: | Line 7: | ||
== Throttle valve requirements == | == Throttle valve requirements == | ||
You will need a laptop with the following software: | You will need a laptop with the following software: | ||
| − | * | + | *MATLAB Simulink® 2014a with the correct plug-ins (Getting started guide Olimexino) |
*Functioning HANcoder integration | *Functioning HANcoder integration | ||
*HANtune program (optional: a HANtune.exe shortcut on your desktop) | *HANtune program (optional: a HANtune.exe shortcut on your desktop) | ||
| Line 21: | Line 21: | ||
[[File:shieldinsert.PNG|400px]] | [[File:shieldinsert.PNG|400px]] | ||
| − | You’ll be using | + | You’ll be using MATLAB Simulink® with the HANcoder plugin to program you Olimexino microcontroller. Plug your Olimexino board onto the sensor shield. Your setup should now look similar to this: |
[[File:ThrottleBodySetup.png|600px]] | [[File:ThrottleBodySetup.png|600px]] | ||
Latest revision as of 14:21, 31 May 2018
Throttle valve requirements
You will need a laptop with the following software:
- MATLAB Simulink® 2014a with the correct plug-ins (Getting started guide Olimexino)
- Functioning HANcoder integration
- HANtune program (optional: a HANtune.exe shortcut on your desktop)
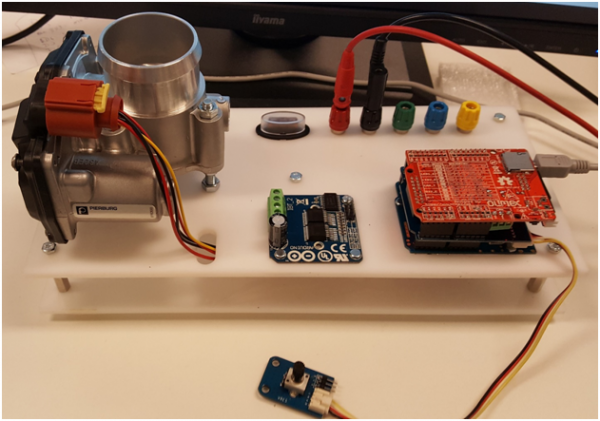
You will need an Olimexino STM32 board that can be connected to your laptop over USB. (USB to mini USB cable) During the assignment, the throttle body setup and a sensor shield with potentiometer will be provided by the HAN. The setup of the assignment will consist of the following hardware:
- Throttle body controller hardware
- Sensor shield
- Potentiometer
- Olimexino
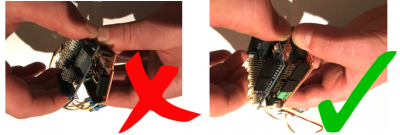
Be careful with the hardware. Make sure that the power adapter and the USB cable are not plugged into the Olimexino when you insert the sensor shield. To prevent bent pins, you will need to make sure to keep the sensor shield straight, when taking it off the Olimexino.
You’ll be using MATLAB Simulink® with the HANcoder plugin to program you Olimexino microcontroller. Plug your Olimexino board onto the sensor shield. Your setup should now look similar to this:

